Showing posts with label BioWare. Show all posts

Monday, November 3, 2008

NWN1 - Visual effects on placeables

It has been a while since I last posted, mainly due to life catching up and becoming a priority for me. You only get one chance at living and interacting with those you love around you, so when they need you stop what you are doing and be with them.

So with that short spiel said, I should step off my soap box and start writing about what the subject of this post is, Visual Effects on Placeables.

A long time ago I read a thread on Bioware forums about applying visual effects to placeables. I can't recall the author, however they laid out the basics for applying effects and thoughts on how to apply them. I must admit after having a look at what you could do with effects I was rather excited.

Applying a visual effect to a placeable, means you are no longer bound by the texture that is set to that placeable. Instead you can choose a Duration type effect from the visualeffects.2da and reskin your object ingame.

I took the basics from the bioware thread and then customised them to be set on enter to an area, using variables to determine if effects were on, and which objects to apply them to. Nothing really exciting in that department, but the results have blown me away.

I was able to make objects of ice, or crystal, blue gems or more importantly reskin objects with Stoneskin and Greater Stoneskin. This means all the bolders, stones and rocks on the tolset, could finally look the same. Some images below of a Henge that I decided to make, based on some comments in the Mystara Dev forums.

This is an image of the basic placebale, viewable in the toolset, hence the red grid and nothing exciting. Due to effects being applied in game, you need to work with the visualeffects.2da and identify an effects that you want to apply. I like to use the glow effects on stones, as they become crystal, or stone on objects that really need to be stone. The stone in the center has the Ghostly Pulse effect, meaning it fades in an out of view. The stones around the center stone, have been reskinned to a basic stone skin. The capped stones, have a Grey Glow applied to them, so that they shine in the dark and are semi transparent.


Following images capture what these reskinned objects look like in game, one the effects apply.


If people are interested, I can put up the code for apply the effects, but if not, well there is no point. I find the application of the effects rather fun and easy to do.

Friday, August 22, 2008

Prefabia Restarted - #5

One thing that is often forgotten by builders and players alike is acknowledging and voting on the sources they use in their world. Without input from the users, the modders and scriptors eventually loose heart and move on things that they perceive has more rewards or community thanks.

Taking the above statement as a truth, I think I should begin to thank the people for the contributions that I am directly or indirectly using as part of Prefabia.

Acknowledgements

Prefabs

Plugins

Updating Plugins .... Tani and Grinning Fool


On another subject but one that comes about due to a scriptor moving on is updating plugins to the latest NWN2 release. Pplugins make life much easier for builders and has made Prefabia a lot more fun to build, shame NWN2 Atari did not include some of these essential tools.

Tani Provided some instructions on how to recompile the plugins to the latest version of NWN2, main thing you need is the source code.

  1. Grab visual c# express from m$ (it's free, the 2005 version is enough, don't know if 2008 is different). http://www.microsoft.com/express/2005/
  2. Grab the source code and unzip it to a folder of your liking.
  3. Open the project file in visual c#.
  4. Look for the broken references to nwn2toolset.dll and oeishared.dll, maybe others too (they are marked with an exclamation mark in a yello triangle). remove the references and add new ones to the latest version of these files.
  5. Compile the project, and move the new dll (found in subfolder bin/release or just bin) to your plugins folder - you should be fine.in case that was to quick take a look at the video at Link . This shows how to fix the references and compile nwn2packer and especially stripease.

Wednesday, August 20, 2008

Prefabia Restarted - #4

I thought it was time to post up some screen shots of whats happening in Prefabia, specifically around the area of Stone Port. Stone Port, will be the first area a player gets to experience once they leave the welcome room and is intended to be the start area for all players regardless of factions.


Stone Port is intended to be gritty and dank, though in the screenshots that follow you can see that I haven't played with the fog, sky etc as yet. That will be one of my final touch ups before I sit down and replicate the area with TerraCoppa.

Image 1: Standing On the Bridge between the Rock looking down at the docks. This bridge is accessed via the moving up through the Rock or from the other side via the mines.


Image 2: Standing on one of the docks down int he port, looking North West.


Image 3: Standing on a dock, looking due North. You can see the Rock in the background.


Image 4: On the centre street in the middle of the buildings, looking East I think.

Image 5: In Stone Port on the West side of town, looking west. Rather pretty if you ask me. Baron or BTH would say too pretty but meh, dank is what they are good at.

Image 6: North West side of the Rock, looking Northwards at one of the High Bridges (walkable).
Image 7: High on the Rock looking down onto the river, no name for that yet.


Image 8: Walking along the spine of the rock, this takes you to one of the lighthouses.


Image 9: Just a pretty image looking Westwards on top of the Rock, ahh stars how you twinkle.


Sunday, August 17, 2008

Prefabia Restarted - #3

No real screen shots today, more of a small note detailing my progress on Prefabia. One of the things that has been annoying me on the Starting Area of Prefabia "Stone Port" is that the docks were not walkable. I have spent a fair bit of time, trying to make them walkable through various methods and having no joy. I tried, lining up the placeable, putting a walkmesh helper placeable on top and finally lifting terrain under then but they still didn't allow a pc to stroll along them.

Then I read a small note on the Bioware forums, where a person suggested setting the dock placeables to environment, draping the walkmesh helper placeable over the top and baking the area. I tried this and bam! My docks are now walkable and you can stroll out past the ships and look out onto the Sea and dream about where you may go or come from.

Now that docks are walkable, I now need to make the ship decks walkable, so that players can interact with the crew and such. The docks will only have two ships in at a time, one inbound and another outwards bound. Players will start on the dock of the inbound ship, the outbound will not take on players and mainly be there for ore/trade collection.

Some images of the process will be posted up later on today, to give people a feel for how to do
this.

Wednesday, August 13, 2008

Prefabia Restarted - #2

A small update but one highlighting an excellent tool by Tani called TerraCoppa. Sadly it is no longer maintained but Tani has kindly provided the source code so that it can be compiled to work in later releases of NWN2.

http://nwvault.ign.com/View.php?view=Nwn2plugins.Detail&id=25&comment_page=3


TerraCoppa allows a builder to rapidly replicate an area and the contents. It can rotate, raise/lower the height of the terrain and migrate all the bits and pieces you would find in area, over to your duplicate.


TerraCoppa will be a major part of my workflow, allowing me to grab and move parts of areas from other prefabs across into my own world. Using the tool you can map up areas outside the walkmesh and make them a new area that you can walk in.


Work Flow.


1. Rotate the map by 90 degrees due to the map orientated in the wrong direction.


2. Shift the map backwards by one grid row, so that the docks that were out of the walkable area now fall into it.


Original Map


Shifted Map, note the green textured sothern part of the map. You get that when TerrCoppa moves things around, texture is default to the map.


3. Shift map one grid to left, so more of the hill is in the walkmesh.


4. Replicated the terrain on the eastern edge and dropped it over the green texture, same with southern. All that remains is to clean up and remove bits that you don't want. You can see the joins in the image below, but a little brush work and gone.


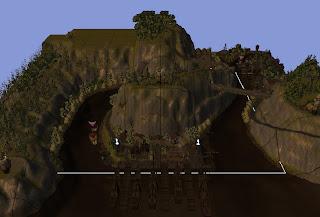
After some quick work and tweaking the water, it is done. This area will form the starting ton for Prefabia. The area will nee some fine touch ups and wameshitig,but is prety well ready to go.
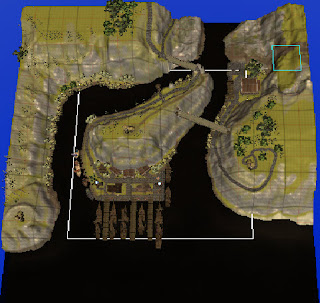

Monday, January 21, 2008

Building a Persistent World in NWN (1&2) - The Prefabia Project. Part 1

I find myself at a point in my knowledge of building a NeverWinter Nights (1&2) Persistent World that I can now begin to document my thoughts with confidence that some of them are correct. To set the scene, I have played on several good PW's (Mystara, Chronicles of Torn, Melnibone and Aeon), built a PW with friends, and now currently help maintain and improve two more. A reasonable amount of experience and a lot of it hard earned or discussed with others who have suffered the pain of building.

So without getting caught in pointless verbiage, I thought I might as well list the top best practices that are IMHO the are a must for building a PW, or improving one if it is already running. Notes these are my opinion, not much else really but if they save someone else some grief, then they are worth pontificating about.

1. Have a plan.
This seems rather basic, but most people forget to work out the stages and understand what needs to be done first for a world to begin. A plan lays out the steps needed, highlights holes and gives you a good checklist to work to as you achieve milestones. Not hard, but few do it.
A plan to be really effective needs to have critical milestones, resourcing and due dates. Milesstones are stages in your project, where ytou have achived a solid chunk of work. This could easily be core systems decided on, base module built, beta release. The dates tie into these, without dates your project will slip further and further behindand the energy you may have built up with the community is lost. REsources can be hardware and people, get these organised early on, keep your team small.

2. Have an understanding of what your world is going to be and more importantly what it is not.
What your world is, will ultimately determine what systems you add, disable or modify. Hardcore RP worlds have different requirements to Hardcore PVP.

Additionally you need to have a world story of some sort, this is covered later.

3. Identify Base systems and haks for your world
Best to identify these early and select or build what is needed. My preference is source from another builder than craft myself. If you source off the vault, remember to vote as well. Authors respond to requests and queries much more readily if you vote.

Core systems to consider, prior to creating custom classes etc are;

  • Death

  • XP

  • Crafting

  • Anti-hacking clientonenter scritps

  • Persistant database or not

  • Debug scripts

  • Playtesting widgets -

  • DMFI

  • Spawning creatures and placeables

  • HCR systems

4. Create a base module

Nice and straight forward, you have your base systems identified, add them to your base module and get it up and running. You can spend some time optimising the systems and ensuring that the base is very stable and error free. This step is rather critical, as this base module becomes the reference module for all your builders to base their work on.

5. World Setting

Take your time and explore what you want your world setting to be and locate your references. You have a choice of writing your own from scrath, using one of the existing settings or using the setting that the nwn engine uses, which is Forgotten Realms. Writing your own is rather exhausting but rewarding at the same time, however you need to consider everthing. Using a a pre-existing setting works a treat, and you can pick and choose what you want your world to be from the parts. Finially the easiest is to use the FR setting for simplicity sake. NWN already has all the items built with FR descriptions, creatures and placeable fit the FR setting, so a large chunk of your work is done.

6. Naming Standards
To ensure consistency in your world, from scripts to areas, I would suggest that naming standards are a must. Listed below are various standards from official to what was used on the Aeon project. Use these as a basis for your own, or as is.

Script Naming Standards
Modified CODI


Placable
* T - Trigger
* D - Door
* R - Trap
* C - Conversation
* E - Encounter
* I - Item - This script is not placed on an item per se, but called by module level scripts.
* X - No Object - Use this for a script that is called by other scripts. Executable scripts.

This character is followed by a two character short for the event it goes in, by category:

* N, M
o CO - onConversation
o DI - onDisturbed
o PA - onPhysicalAttacked
o SP - onSpawn
o UD - onUserDefined
o SC - OnSpellCastAt
o BL - onBlocked
o DM - onDamaged
o HB - onHeartbeat
o DE - onDeath
o CR - onCombatRoundEnd
o PE - onPerception
o RE - onRest

* A
o EN - onEnter
o EX - onExit
o HB - onHeartbeat
o UD - onUserDefined

* O
o CE - onClientEnter
o CL - onClientLeave
o PR - onPlayerRest
o RS - onRespawn
o DY - onPlayerDying
o DE - onPlayerDeath
o LE - onPlayerLevelUp
o IA - onItemActivated
o IQ - onItemAquired
o UI - onUnaquireItem
o ML - onModuleLoad
o HB - onHeartBeat
o UD - onUserDefined
o EI - onEquipItem

* P
o US - onUsed
o HB - onHeartBeat
o DE - onDeath
o AT - onAttacked
o SC - onSpellCastAt
o DM - onDamaged
o OP - onOpen
o OC - onClosed
o DI - onDisturbed
o LO - onLocked
o UL - onUnlocked
o UD - onUserDefined

* T
o CL - onClick
o EN - onEnter
o EX - onExit
o HB - onHeartBeat
o UD - onUserDefined

* D
o AT - onAreaTransitionClick
o OC - onClosed
o DM - onDamaged
o DE - onDeath
o FO - onFailedToOpen
o HB - onHeartBeat
o LO - onLocked
o OP - onOpened
o AT - onAttacked
o SC - onSpellCastAt
o UL - onUnlocked
o UD - onUserDefined

* R
o DI - onDisarmed
o TT - onTrapTriggered

* E
o EN - onEnter
o EX - onExit
o OE - onExhausted
o HB - onHeartBeat
o UD - onUserDefined

* C
o AT - Actions Taken
o AP - Appears When (StartingConditional Script)
o AB - onConversation Aborted
o EN - onConversation end

* I
o US - Called when the item is used.
o AQ - Called when the item is Aquired.
o UA - Called when the item is UnAquired.

Prefix examples

Module OnClientEnter script prefix: OCE_
Area OnEnter script prefix: AEN_
Placeable OnUsed prefix: PUS_


Consider this post a living document, which I will add to over time.

Acknowledgements to BarryTheHatchet and Relexx

Saturday, December 29, 2007

NWN Scripting - Naming an Object Part 1

Today, I decided to work on a script for NWN1 that will take a players character first name and apply it to an item. Nothing really hard but I might as well document my pain at trying to work out how to do it. As others have noted elsewhere, I struggle to spell words correctly, or indeed keep my writing coherent. So as you can see, scripting can be a real pain in the backside for me.

My first pass at this script is to first get the players name using GetName(oPC) with oPC being the PC. This returns the Firtsname and the Surname of the PC, with a space separating them. I now need to take the leftmost string, as this is what I want to use to name an item.
Easier said than done it seems, when I scan the Name of the PC for the location of a space it returns a 0. Seeing that the name of the PC is 13 characters long and the space is in the middle, well this sucks.

Well spent most of the day on this, back and forth and realised I am truly a sucky coder but I got it to work at least. I can now pull the first name of characters that have a spaces in them.

Only problem now is that names with no spaces have the front character truncated. I am too tired to really stress so I put it up on Bioware, in hope of some answers.

Read it here on Bioware...
http://nwn.bioware.com/forums/viewtopic.html?topic=609475&forum=47&sp=0#5554701

Amazing, the community resonded and suddenly my code has gone from a monster to something that is rather useful.

Below is what a gifted script writer can do. Axe Murderer, took my rather horrific piece of code and made something that is rather elegant. Now I just need to work my way through it to understand it better.

//Put this on action taken in the conversation editor

string GetFirstName( object oCreature) // Function to get the First Name

{ if( !GetIsObjectValid( oCreature)) return ""; // Check to see if it is a PC

string sName = GetName( oCreature);
int iPos = FindSubString( sName, " ");// Find the space in the Full name
if( iPos < 0) return sName; // If there are no spaces the name is made default

// If there are spaces then do this
while( iPos == 0)
{ sName = GetStringRight( sName, GetStringLength( sName) -1);
iPos = FindSubString( sName, " ");
}
// Ternary condition which does an if else sorto of.
return ((iPos < 0) ? sName : GetStringLeft( sName, iPos));
}


void main()
{ object oPC = GetPCSpeaker(); // PC who is speaking to NPC
string sFirstName = GetFirstName( oPC); // Get the PC's first name.
SendMessageToPC( oPC, "DEBUG ks_namer: sFirstName is " + sFirstName );
SpeakString( "My First name is " +sFirstName +" and I am " +IntToString( GetStringLength( sFirstName)) +" characters long");//Spor Debug
}